Flow Designer’s no-code environment opens the doors to automation for both technical and non-technical users alike. It empowers businesses to automate anything from simple day-to-day tasks to complex business transformations.
This tool is a testament to ServiceNow‘s commitment to innovation, offering a user-friendly interface that allows for the building of multi-step flows from reusable components. The result was a drastic reduction in manual effort, increased operational efficiency, and a significant boost to productivity.
In this article, we will explore the ins and outs of this game-changing tool and how you can leverage it to drive your business forward.
Understanding Flow Designer
Diving deeper into the Flow Designer, we uncover a tool that is truly pushing the boundaries of what’s possible in the realm of process automation. With its intuitive interface and powerful capabilities, Flow Designer is transforming the way businesses operate.
The brilliance of Flow Designer lies in its simplicity. It enables users to automate tasks using natural language. No longer do you need to be a seasoned coder to automate processes. Simply describe your process in everyday language and let Flow Designer do the rest.
But don’t let its simplicity fool you. Flow Designer is packed with robust features that make it a heavyweight in the world of workflow automation. It allows for the creation of multi-step flows from reusable components, enabling businesses to streamline their operations and increase efficiency.
One of the unique features of Flow Designer is its ability to integrate seamlessly with other ServiceNow applications. This allows you to extend automation across your organization, creating a truly connected enterprise.
How It Works
Comprising five pivotal content types—flows, subflows, triggers, actions, and conditions—it empowers both the tech-savvy and non-technical users to craft potent and reusable workflows. Journey with us as we dissect the core components driving this transformative platform.
Flows
Is a dynamic automated process that incorporates a cohesive set of actions and subflows. Triggered by specific events, it culminates in the seamless automation of business logic for an application or process.
Subflows
A subflow constitutes a sequence of reusable actions and data inputs that can be initiated from a flow, subflow, or script. Illustrative examples of subflows encompass iterating on related records, adding comments, or notifying users of record changes.
Triggers
It is an operation that, upon specification, automatically kick-starts a flow. For instance, it could involve creating a record in a designated table or executing a scheduled job.
Actions
An action stands as a singular, reusable operation executed by the system. Notable examples include creating a REST integration with a third-party service, updating field values, requesting approval, or logging values.
Conditions
It functions as a statement that dictates when or how an action runs. For instance, it might specify running an action only if a particular field exceeds a predefined value.
Setting Up Flow Designer
Getting started with Flow Designer is a straightforward process, designed with user-friendliness in mind. Even if you’re not tech-savvy, you’ll find the setup procedure to be intuitive and hassle-free.
Before we dive into the setup process, let’s talk prerequisites. A critical requirement is access to a ServiceNow instance. This could be a developer instance or a production instance, depending on your needs and access rights.
Once you have access to an instance, navigate to the Flow Designer homepage by typing ‘Flow Designer’ in the filter navigator. Click on the Flow Designer application and voila, you’re ready to start creating flows.
But wait, there’s more. To get the most out of Flow Designer, it’s recommended that you familiarize yourself with the layout. The interface consists of three main components: the canvas, the toolbox, and the properties pane. Each serves a unique purpose, and understanding how they work together will make your flow creation process a breeze.
Canvas
Purpose
The canvas is the visual workspace where the magic happens. It’s the digital canvas where you design your workflows, arranging actions, triggers, and conditions to create a seamless flow.
Functionality
- Drag and drop elements: Easily place actions, triggers, and conditions onto the canvas for an intuitive design experience.
- Visual representation: Provides a graphical representation of the workflow, making it easier to comprehend the logical flow of your process.
- Editing and connecting: Allows you to connect elements, define relationships, and edit properties directly on the canvas for real-time adjustments.
Toolbox
Purpose
The toolbox is your toolkit within Flow Designer, offering a repository of pre-built elements and functionalities ready for integration into your workflows.
Functionality
- Pre-configured elements: Access a library of actions, triggers, and conditions that are ready to use, saving time and effort in designing workflows.
- Search and filter: Efficiently locate specific elements by utilizing search and filter options within the toolbox.
- Customization: Create your own reusable subflows and actions to build a customized toolbox tailored to your organization’s unique requirements.
Properties pane
Purpose
The properties pane is the control center where you fine-tune the details of each workflow element. It allows you to customize settings, define inputs, and configure parameters.
Functionality
- Element configuration: Provides detailed settings for each element on the canvas, enabling customization of actions, triggers, and conditions.
- Input and output definitions: Define inputs required for each element and understand the expected outputs to ensure seamless integration.
- Dynamic adjustments: Modify properties in real-time, allowing for dynamic changes to your workflow without disrupting the overall design.

Creating Your First Flow
Ready to roll up your sleeves and create your first flow? Let’s dive into the step-by-step process of building a basic flow in Flow Designer.
Step 1: Launch Flow Designer
From your ServiceNow instance, type ‘Flow Designer’ in the filter navigator and click on the application to open it.
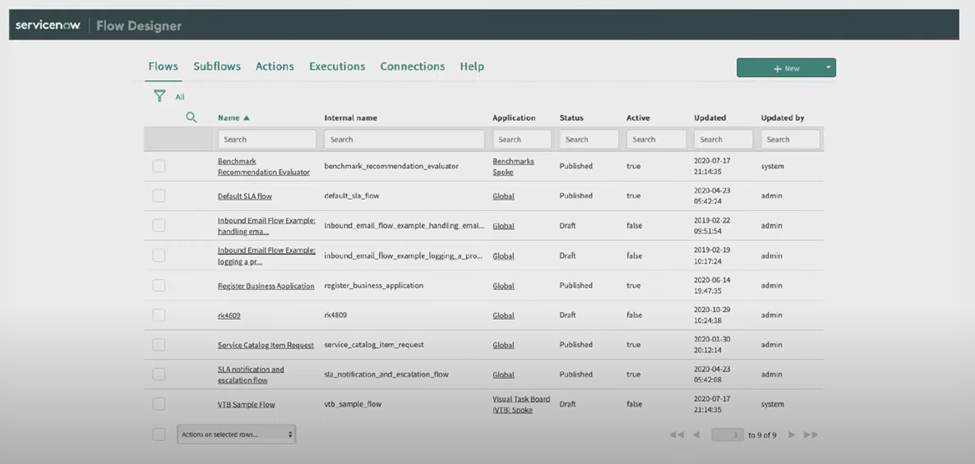
Step 2: Create a new flow
Click on the ‘+ New’ button at the top left corner of the screen. This will open a new tab where you can start building your flow.
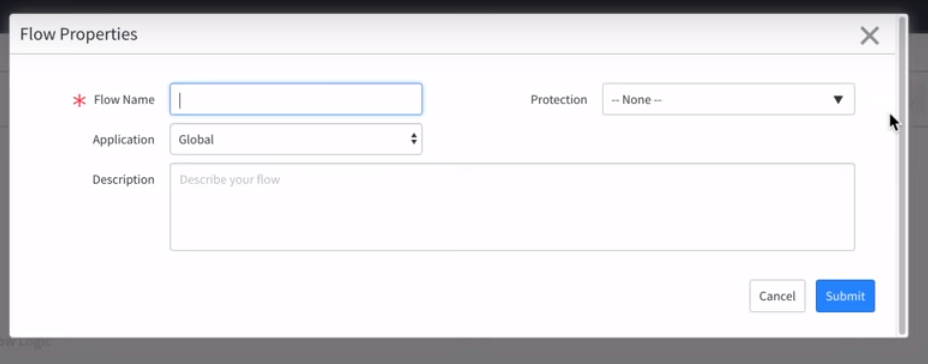
Step 3: Name your flow
Give your flow a name and a description. Make sure it’s something descriptive so you can easily identify it later.
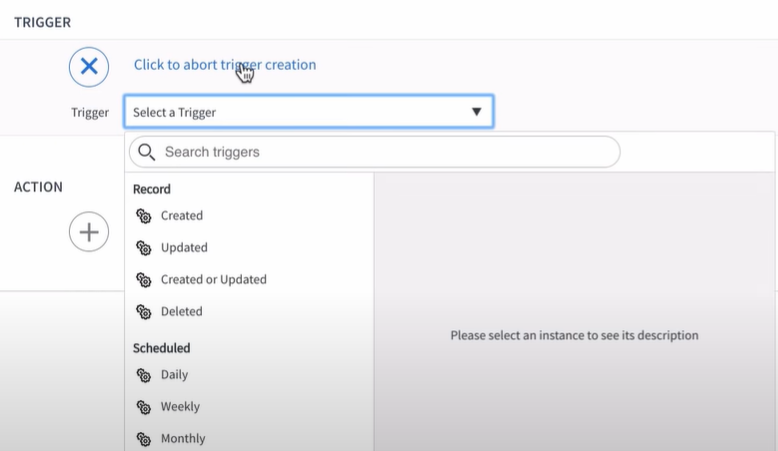
Step 4: Select a trigger
Every flow starts with a trigger. This could be a record change, an email, or a scheduled event. Select the appropriate trigger for your flow.
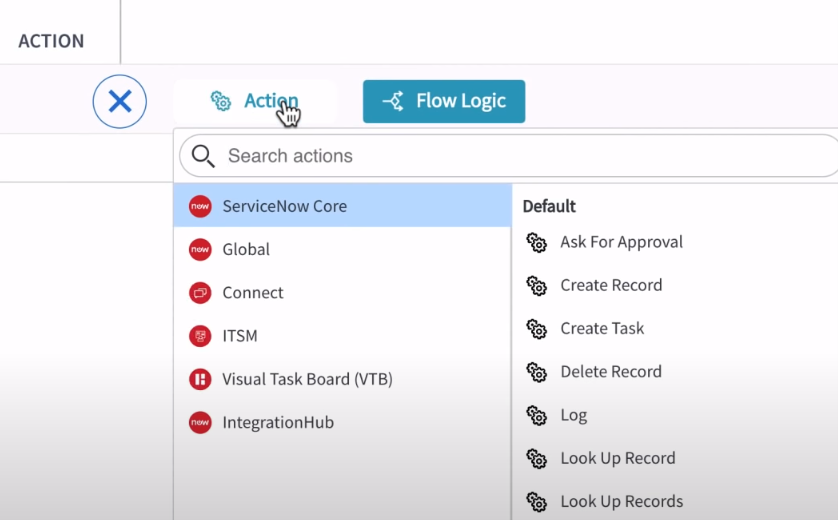
Step 5: Add actions
Actions are the steps that your flow will execute once the trigger is fired. Click the ‘+ Action’ button and select the actions you want to include.
Step 6: Save and test your Flow
Once you’ve added all your actions, save your flow, and test it to make sure everything works as expected.
And there you have it! You’ve just created your first flow in Flow Designer. It’s that simple. But remember, this is just the beginning. The real power of Flow Designer lies in its ability to build complex, multi-step flows that can transform your business processes.
Understanding Actions and Triggers
In the world of Flow Designer, two terms reign supreme: Actions and Triggers. These are the bread and butter of any flow, dictating when it executes and what tasks it performs.
Let’s start with Triggers. Think of them as the starting gun for your flow. They determine when a flow’s logic executes. This could be a change in a record, an incoming email, or even a scheduled event. Every flow has one trigger, serving as the ‘if’ in your ‘if-then’ statement.
Moving on to Actions. These are the tasks your flow performs once the trigger fires. For example, if the trigger is an incoming email, the action could be sending a response, updating a record, or notifying a team member. Actions are essentially the ‘then’ in your ‘if-then’ statement.
To illustrate, consider a simple flow where the trigger is a customer submitting a support ticket (the ‘if’), and the action is sending an auto-response email (the ‘then’).
Unpacking these concepts is key to mastering Flow Designer. With a solid understanding of Actions and Triggers, you’re well on your way to creating powerful, efficient workflows that can revolutionize your business processes.
Advanced Features of Flow Designer
Once you’ve mastered the basics of Flow Designer, it’s time to explore its advanced features. These powerful tools can elevate your workflows, enabling complex, multi-step processes.
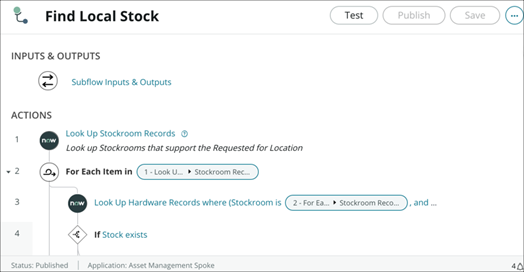
Let’s start with Subflows. These are reusable components that allow you to define a sequence of actions once and use them across multiple flows. They are a great way to streamline your workflow creation process.
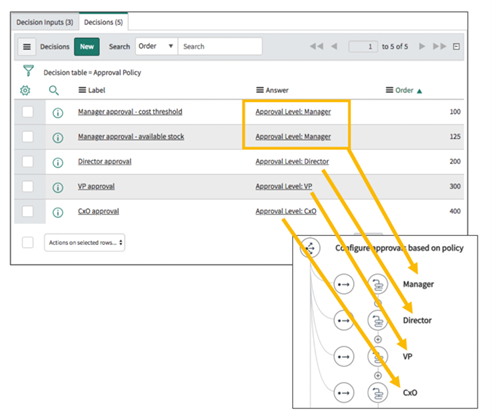
Next up, Decision Tables. These offer a visual approach to defining complex business rules. They allow you to map out different outcomes based on various conditions, making your flows more flexible and adaptive.
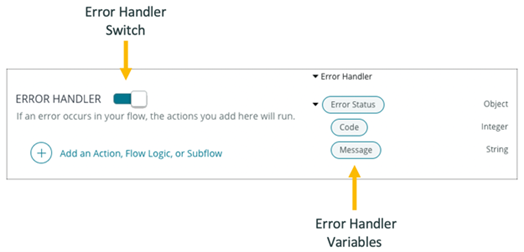
Error Handling is another crucial feature. It lets you define what actions to take when something goes wrong during the execution of your flow. This could be sending an error notification, logging the error, or even triggering a different flow.
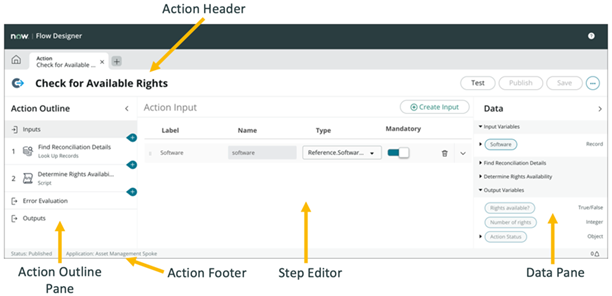
Finally, there’s Action action steps. This feature allows you to create custom steps that can be reused across flows. These steps can include scripts, integrations with other systems, or even UI actions.
These advanced features of Flow Designer open up a world of possibilities, allowing you to automate even the most complex business processes.
Conclusion
We’ve journeyed together through the vast landscape of Flow Designer, exploring its basic building blocks, diving into advanced features, and troubleshooting common hiccups.
From triggers that set your flows in motion, to actions that shape the journey, and advanced tools like subflows and decision tables that add layers of complexity and flexibility, we’ve uncovered the power of Flow Designer.
If you’re eager to kickstart your journey into implementing ServiceNow tools and enhancing your workflows, don’t hesitate to reach out to us.
As you continue to explore and master Flow Designer, remember to stay connected with us. Follow Inclusion Cloud on LinkedIn for more guides, insights, and updates on all things ServiceNow.


